
In the guide below we will guide you through:
- How to set up a VPN on your NAS
- How to test to make sure your real IP isn’t leaking
- Some of the advantage to using a VPN on your Synology NAS
Table of Contents
Getting Started
In order to set up a VPN client on a Synology NAS you will need to follow these basic steps outlined below. One thing to note is that all Synology devices support the 3 major VPN protocols: PPTP, L2TP, and OpenVPN. It’s recommended that you use OpenVPN for security and privacy purposes. To setup OpenVPN for Synology you will need to:
- Pick a VPN provider – we strongly recommend the following providers , Surfshark, or PureVPN due to speed and security
- Download the necessary config files along with the .crt and .key files ( this is very easy to get)
Best VPN Providers For Synology NAS
![]()
![]()
Installing a VPN on Your Synology NAS
- Go to your Synology Control Panel

2. Go to Network -> Network Interface -> Create -> Create VPN Profile
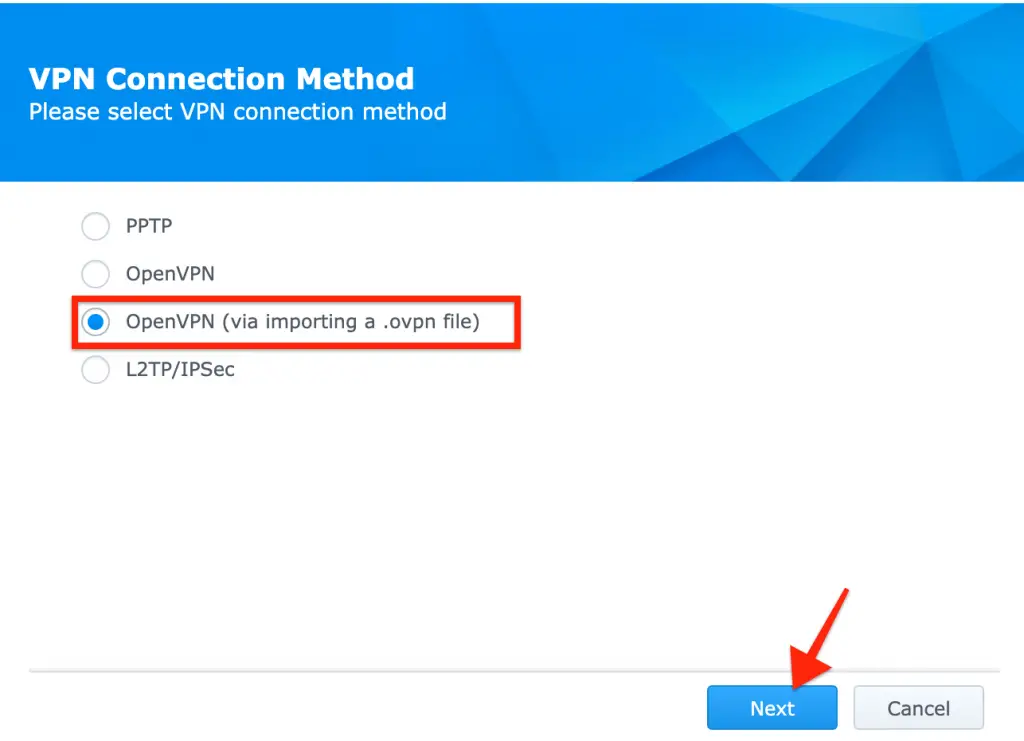
3. Select OpenVPN (via importing a .ovpn file) and click Next.
4. Next, you should see the form below:
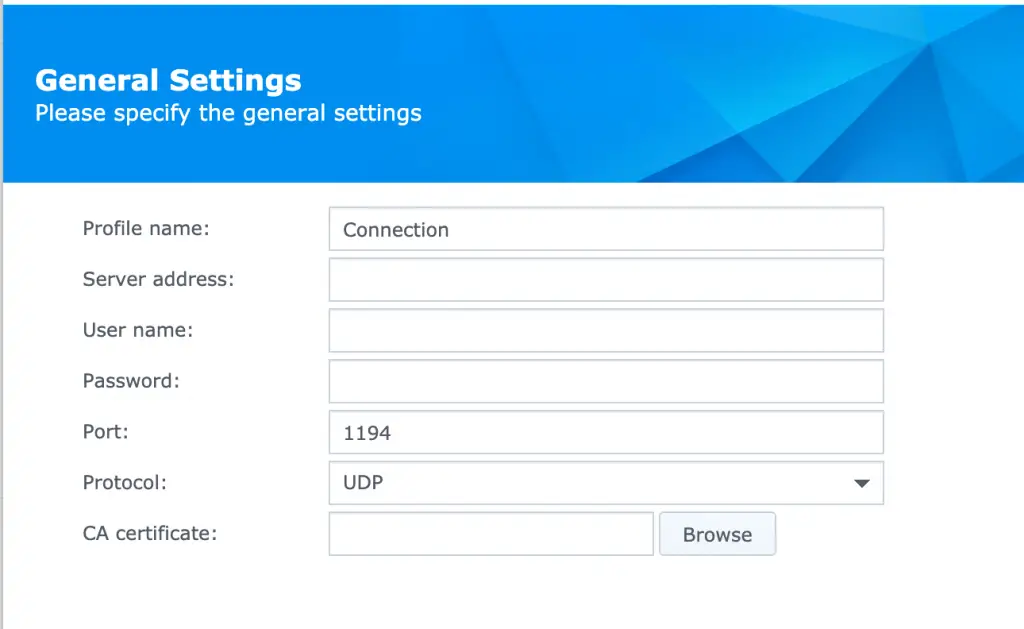
5. Just fill out each field with the info provided by your VPN provider. If you’re using just login to your account on their website and then navigate to https://www.expressvpn.com/setup#manual
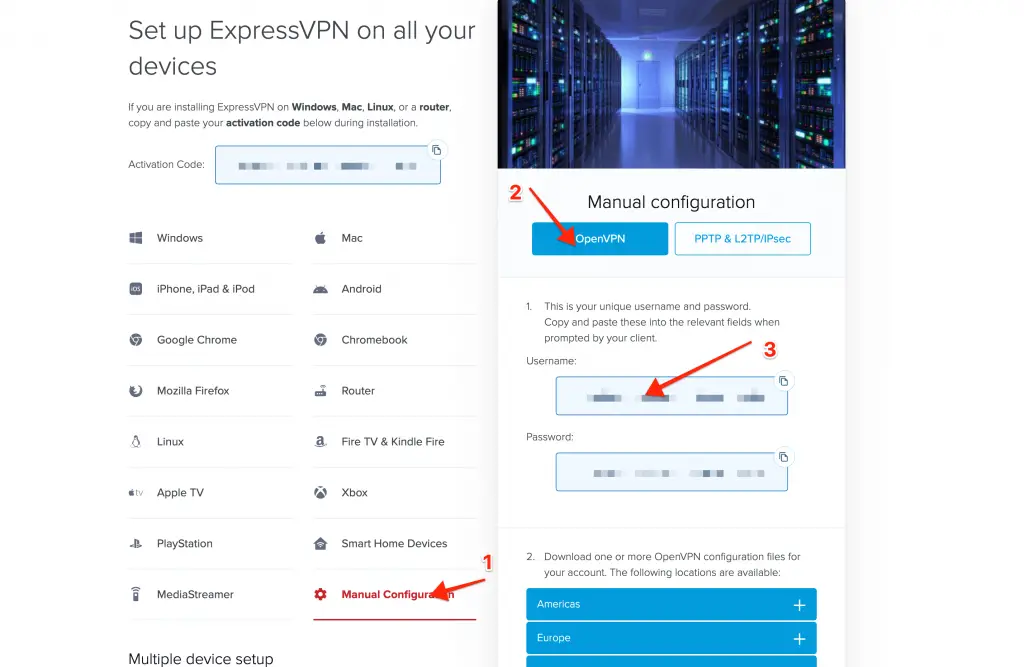
6. After entering your username and password you will need to scroll down on the right and look for the OpenVPN configuration files, just select a location and it should automatically download the file. The just upload that file into the proper field.
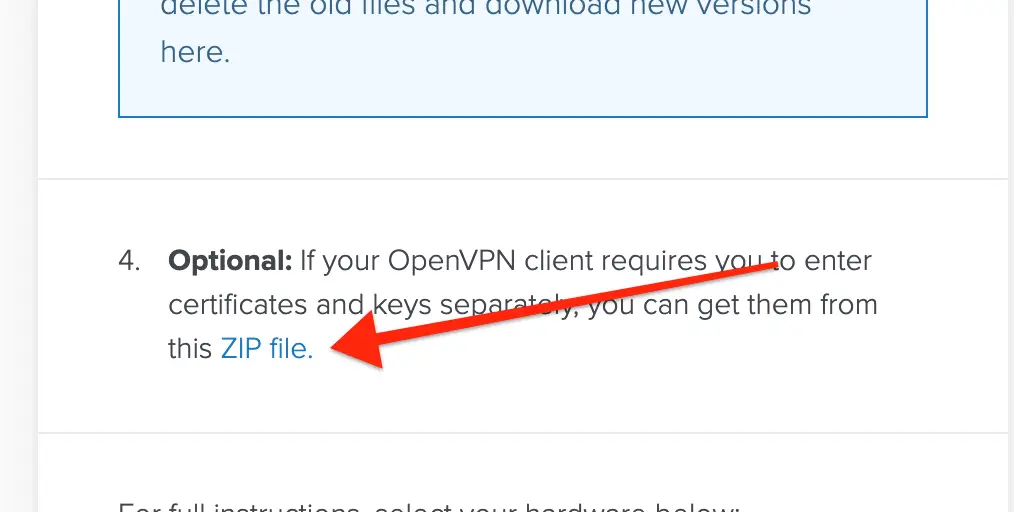
7. Next, you will need to scroll down and download the zip file with the additional certificates and keys shown here:
8. Then just upload each of them into the respective fields in the form under Advanced Options and then press Next.
9. Now select all options on the next screen
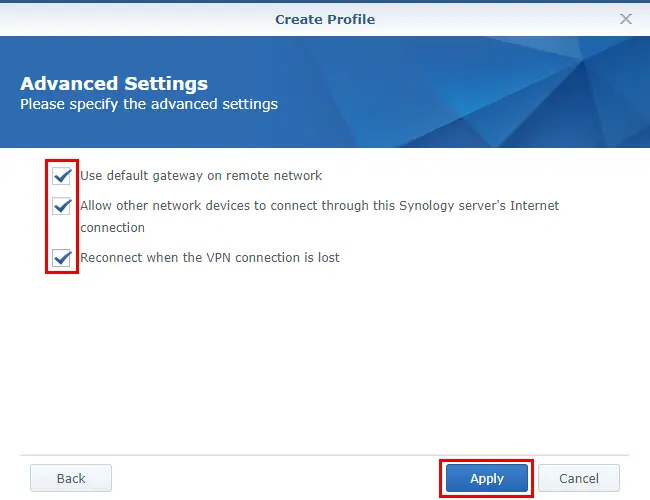
10. Once you are done hit Apply.
11. IMPORTANT (Do Not SKIP):
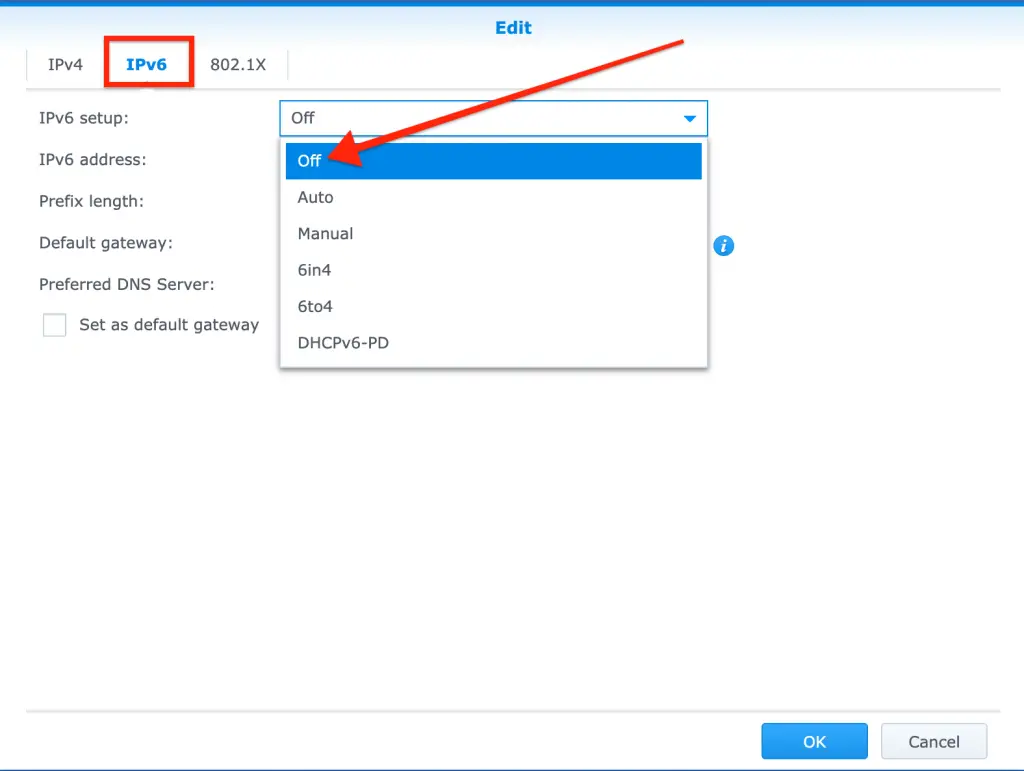
Before you enable VPN on your Synology, it’s highly recommended that you turn off IPv6 to prevent IPv6 traffic from leaking outside of the VPN tunnel.
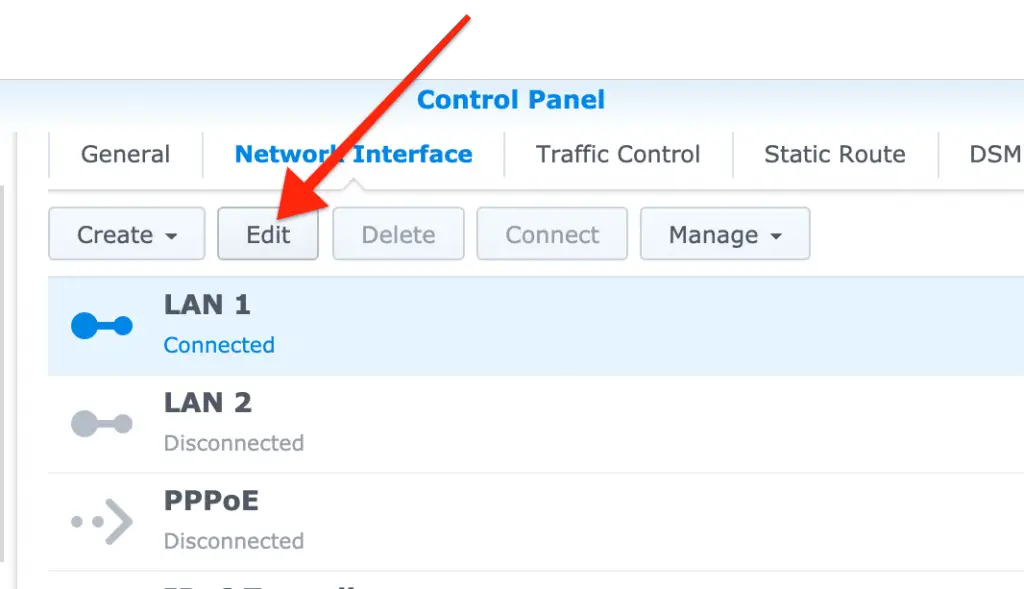
To turn off IPv6, go to Control Panel > Network > Network Interface. Then click the LAN menu to expand it. Click Edit.
Under the Ipv6 Setup, there is a dropdown and you want to turn that OFF
Now select OK and it is recommended that you reboot your server.
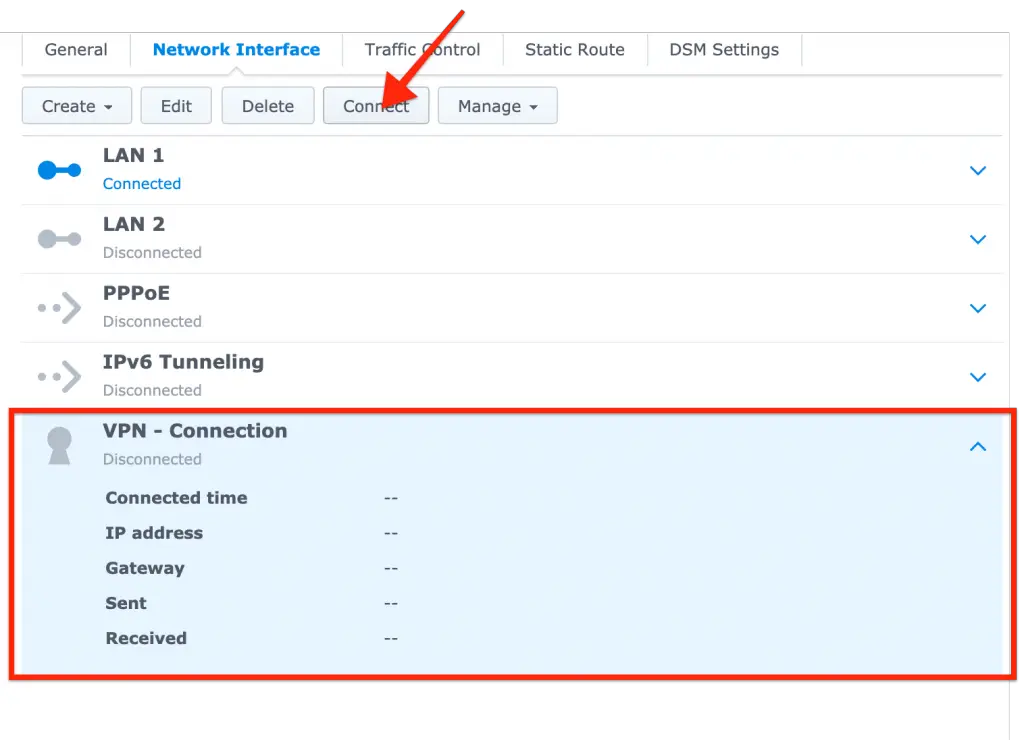
Once you have restarted you can now enable your VPN connect if it is not already by going to Control Panel > Network > Network Interface and then highlight the VPN connection, then select Connect at the top as shown below.
Test DownloadStation to Make Sure it’s Not Leaking Your IP Address
In order to test to make sure your IP address is not being leaked and that your Download Station application is using your VPN successfully there are a few simple steps:
- Go to ipleak.net
- Scroll down the page until you see Torrent Address Detection then select Activate

3. Next, the screen will change and show you a magnet link, right-click that and choose copy link address

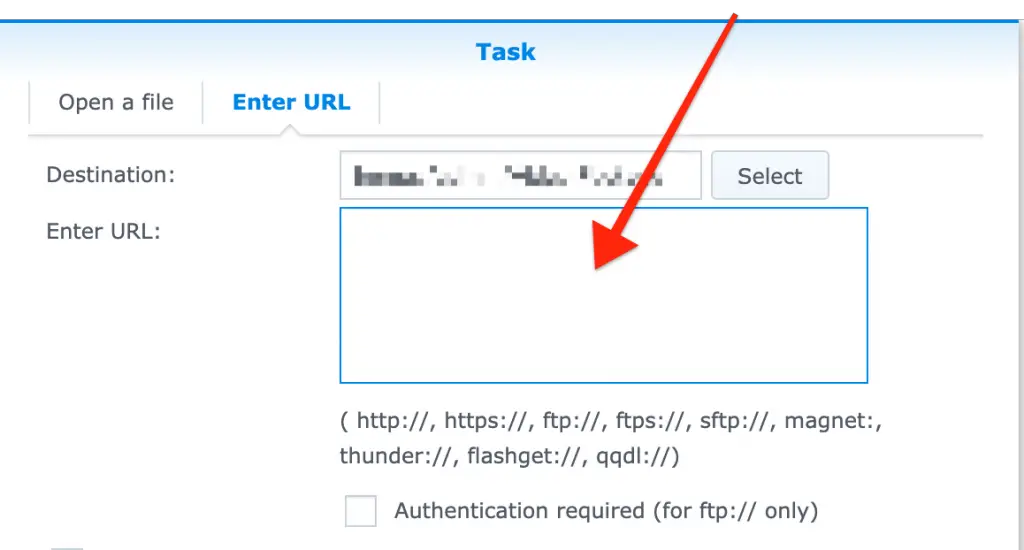
4. Now that you have the address copied to your clipboard, go into Download Station on your Synology, look fo the Globe Icon with a plus at the top and click it:
![]()
5. Then paste the URL into the box and click OK
6. This will start downloading a torrent, go back to the Ipleaks page, and click the refresh button inside the box where you downloaded the magnet link. You should now see the IP address that your download station is using, insert this at the top of the page to make sure it’s not your personal IP address!

That’s it! You’re all done now.
What are the Advantages of using a VPN for my Synology NAS?
- VPN encryption protects against eavesdropping and wiretapping, to prevent third parties from intercepting and reading your files.
- Your search history, online behavior, user patterns and location of your downloads and uploads are hidden from your Internet service provider
- A VPN prevents packet sniffers from reading transmitted data.
- It allows you to use geolocation-related plugins as some may be blocked in your location.
- Access peer to peer websites to share content (be legal!) without being blocked and monitored against your choice by your internet service
How do I add NordVPN to Synology?
In order to add NordVPN to Synology, first, you will need to sign up for the NordVPN service. While they do offer a 30-day free trial, this VPN is a paid for subscription. Once you have received confirmation of the service, you can then begin the installation process.
To do this, you will need to log into the web interface of your Synology NAS, and click on the control panel. From here, you will want to choose the Network option. This will then bring up the network interface.
You will want to click Create, and then Create VPN profile. From here, you will need to select OpenVPN to add NordVPN. You will need to do this via an .OVPN file in order to make the VPN compatible. Click here to download ovpn files from NordVPN. Click next.
You can choose to use the server which is best suited for you. Once you have downloaded the .OVPN file, you will need to create a profile within the general settings, with a username and password.
After this has been completed, NordVPN will be added to Synology. The NordVPN dashboard can then be accessed by clicking on the My Service option within your settings. You will need to ensure you click apply to accept the changes you have made, and connect the VPN up to Synology.
Which VPN is best for Synology?
The best VPN for Synology is down to personal preference to an extent. However, there are a handful of options that are typically better suited to Synology than others. As we have already discussed, NordVPN is a great option to consider, and it is fairly easy to install.
Some other great options include ExpressVPN. This is a very popular service, as it offers quick connection speeds, and it is a secure VPN. The set-up is quick and seamless.
Another great option is CyberGhost VPN. This allows you to use their app in addition to Synology. It is easy to navigate, and is a great option for beginners. If you are looking for a less expensive option, you will want to consider SurfShark. While it is a cheaper option, it is still fantastic. The speeds are quick, and it is a reliable VPN overall.
All of these options are fantastic to consider.
Thanks for the post! It was incredibly helpful for me! 🙂
I use pureVPN and usually connect thru Venezuela. I downloaded the .ovpn files from the link but don’t know which one to select? Then there’s actually 2 directories to choose from; TCP and UDP?
And where do I find the cert files?
Help!